"Borderlands 2" is an over-the-top romp of a game that is at its absolute over-the-top best when it's played with other people. But playing well with others isn't always easy. Gearbox You may think that the best thing about "Borderlands 2" is the guns. And, well, you might be right. At least in part. Like the first (much loved) "Borderlands" game, "Borderlands 2" is a first-person-shooter/role-playing mashup that finds players on a distant planet, scooping up a stunning array of guns (there are "millions and millions" of them) that must then be used to take on a wildly colorful host of bad guys and even badder creatures. But give this game some real playtime and you'll discover that, like the first "Borderlands," what really makes "Borderlands 2" tic...
Get link
Facebook
X
Pinterest
Email
Other Apps
Blondie Punk Pop Art Pink Poster Poster Print
Get link
Facebook
X
Pinterest
Email
Other Apps
Make your own pop fine art portrait
Here we'll convert a bland portrait into a pop art masterpiece. It's a brilliant way to get creative and enliven your forgettable shots. For this tutorial, nosotros'll be using Photoshop filters, choice tools, Adjustment Layers and Layer Masks, and the Hue/Saturation command.
Pop Art: 8 artists every designer should know
Y'all may have noticed that our start image isn't that sharp! This is an added bonus of pop art images: yous can use images that would otherwise accept been discarded.
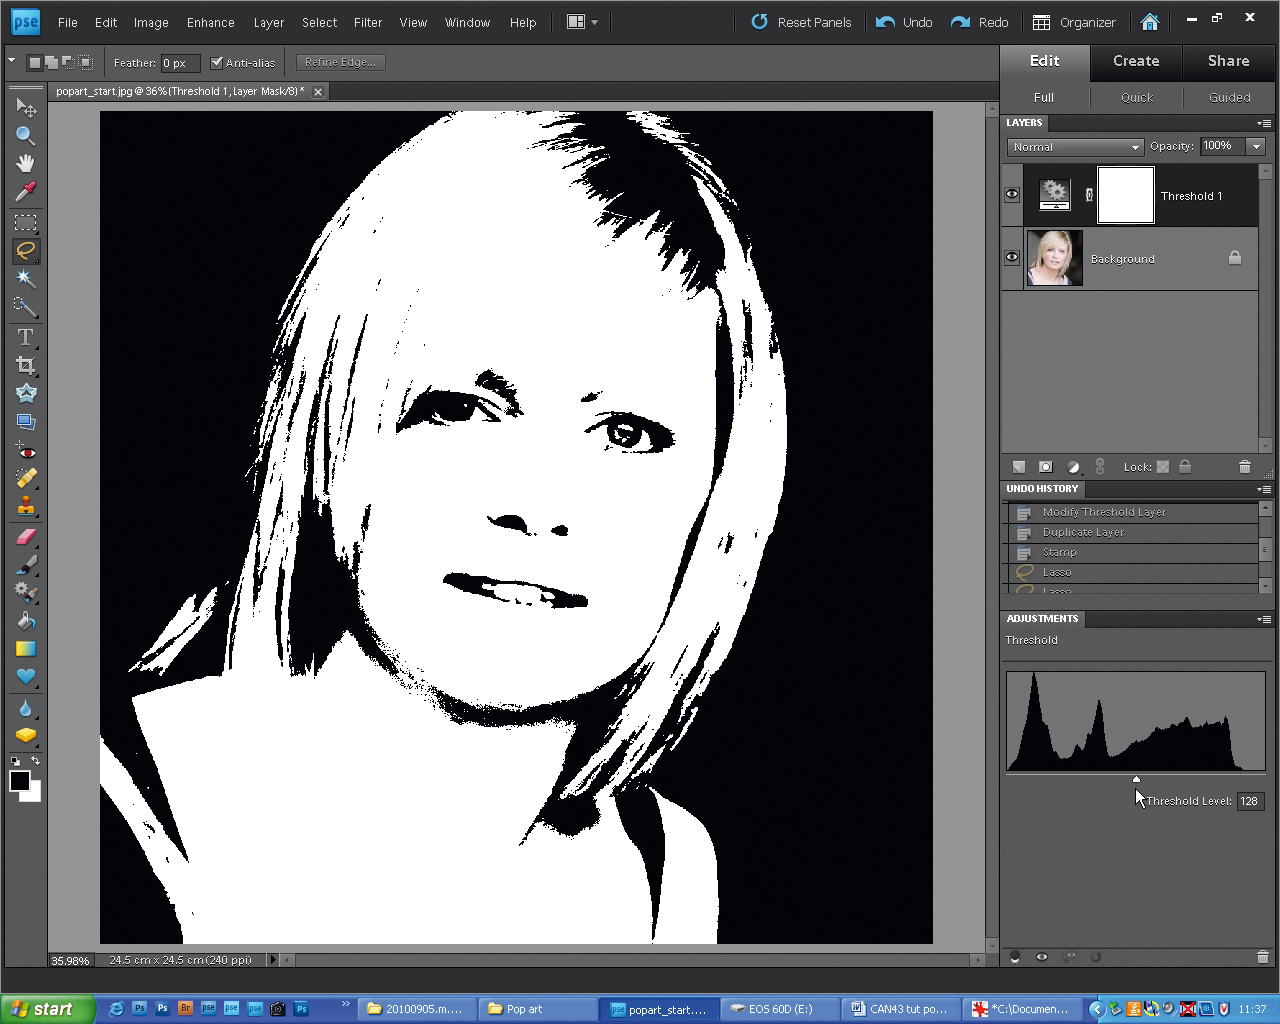
01. Make information technology mono
Click to see the full size paradigm
First open your portrait in Photoshop. Go to 'Layer > New Aligning Layer > Threshold', and set Threshold to about 128. To bring out more than detail in the eyes and mouth, select the 'Background' layer, go to 'Layer > Duplicate Layer'. From 'Filter > Sketch > Stamp', set Light/Nighttime Balance to 26 and Smoothness to 1. Now utilise the Lasso tool to draw around the eyes and oral fissure, property down Shift to add to your selection each time.
02. Brighten your background
Click to see the full size image
Click Add Layer Mask to create a mask out of your choice. At present to change the background colour from black to green. Highlight the summit 'Threshold 1' layer and employ the Quick Choice tool to select the background either side of the figure. Hold Alt to subtract from your selection in order to tidy it upward. Click the half-moon icon on the Layers palette, and select a Solid Colour Adjustment Layer.
03. Make clean up edge detail
Click to see the full size image
Cull a green from the Colour palette. To tidy the edges, apply the Castor tool (press B) to paint over your Layer Mask to reveal detail beneath. Press D to change the default foreground/background colour to white/blackness, printing X to prepare foreground colour to black, then paint circular the edges of the hair if needed. Click X to toggle between a white/black castor if y'all need to paint the green background dorsum in.
04. Brand the hair stand out
Click to run across the total size image
To turn the pilus vivid xanthous, first grab the Magnetic Lasso tool. Beginning at the bottom-left of the hair and depict advisedly around the outside border. Utilize your artistic judgement when it comes to the within strands and fringe! Keep drawing until you achieve your outset point once more, and click when 2 modest circles appear to complete the selection. Again create a Solid Colour Adjustment Layer, option a yellow, and click OK.
05. Blend and castor
Click to come across the full size epitome
Use the drop-down menu in the Layers palette to ready the Blending Way to Multiply, revealing the hair outlines underneath. Reduce Opacity from 100% with the slider to lessen the color's impact. Don't worry if your selection isn't neat – pop fine art should look a piddling uneven! You lot tin tidy information technology up with a white/blackness brush over the Layer Mask to add/remove the yellow.
06. Adjust skin tones
Click to see the full size image
Use the Quick Selection tool to select the face, neck and breast. Ensure 'Sample All Layers' is ticked. Press Alt to remove areas such as shoulder straps from your selection. Then repeat as before; create a Solid Colour Adjustment Layer, choose a pink, ready Blending Style to Multiply, adjust Opacity if necessary. Utilize a xxx-pixel white/blackness brush to pigment over the Layer Mask and clean up any unwanted white $.25.
07. Alter center colour
Click to meet the full size image
To plough the optics blue, zoom correct in (ctrl and +) and utilise the Lasso tool to depict around the iris of each eye. Then repeat the steps above to plough them blueish, dropping Opacity downwards for more realistic await, and once again apply Brush tool on a Layer Mask to tidy up any spilt ink! Do the same for the shoulder straps; nosotros chose a purply-blue colour here.
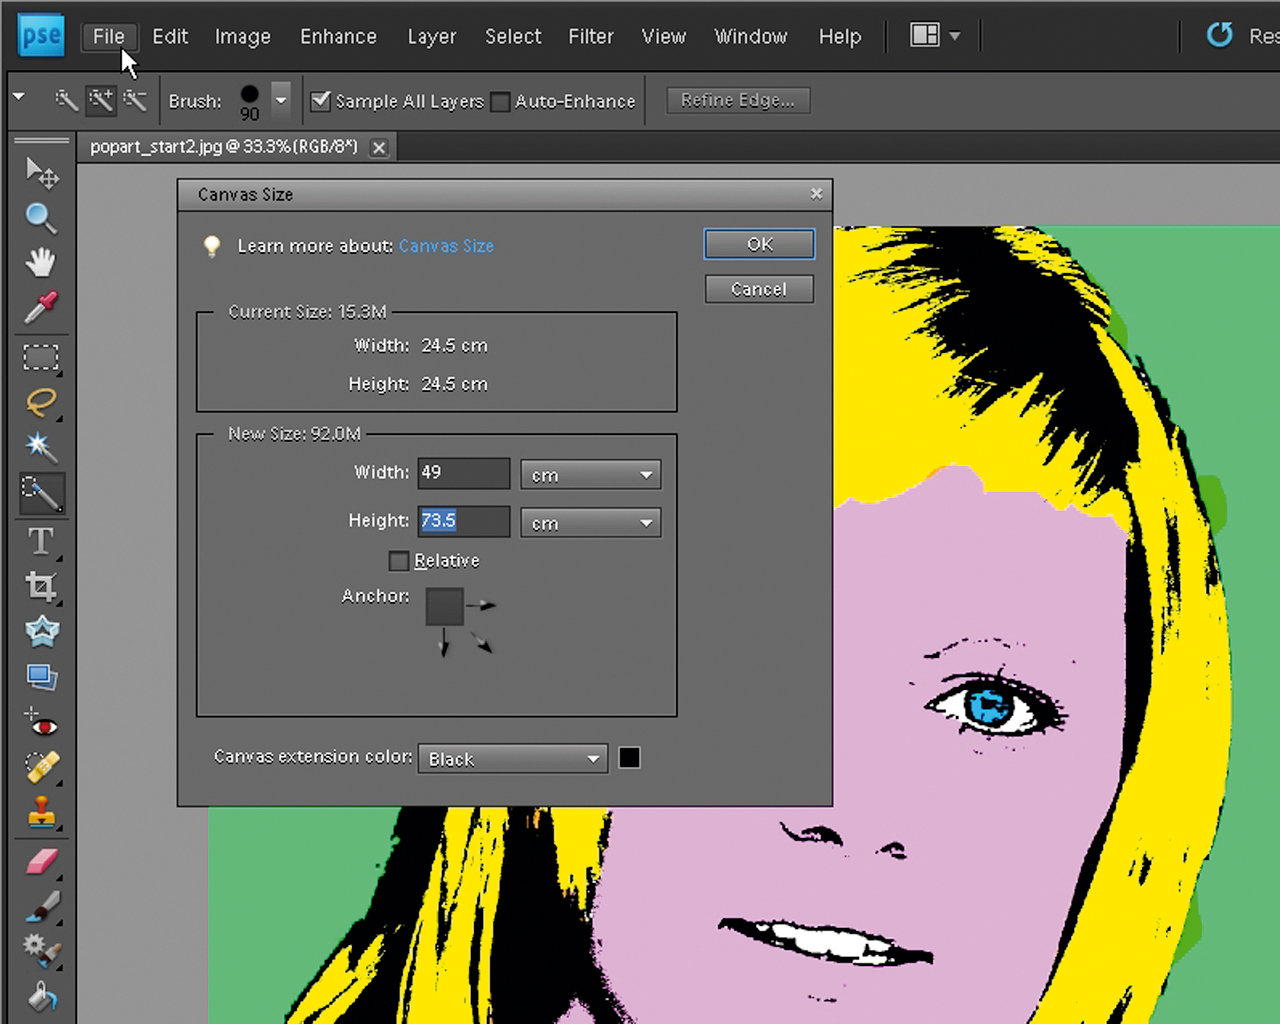
08. Increase sheet size
Click to see the full size paradigm
To create more than versions, starting time go to 'Layer > Flatten Paradigm', then 'File > Save As', and rename your file (we've used 'popart2.jpg'). Go to 'Image > Resize > Sail Size'. To extend the canvas, untick the Relative box, click the height-left arrow to anchor the image, and alter to width 49cm and elevation 73.5cm for a portrait image. Finally, set the Canvas Extension Color to blackness.
09. Mix it upward
Click to encounter the total size prototype
Salve this new image with a new version name ('popart3.jpg'). Reopen 'popart2.jpg', and press Ctrl+U to open up Hue/Saturation. Simply move the Hue slider left or right to create a different coloured pop fine art image. And then use the Move tool to elevate-and-drop your new pop art flick on to the blank canvas space on 'popart3.psd'.
10. Put it all together
Click to encounter the full size paradigm
Get back to 'popart2.jpg', open Hue/Saturation and repeat the above process until you accept four or vi vibrant images on the 'popart3.psd' paradigm. Move the images around on the canvas (highlighting the correct layer) and so the images are in the all-time club and with no similar colours adjacent to each other. Get to 'Layer > Flatten', and salvage information technology every bit a single-layered JPG.
"Borderlands 2" is an over-the-top romp of a game that is at its absolute over-the-top best when it's played with other people. But playing well with others isn't always easy. Gearbox You may think that the best thing about "Borderlands 2" is the guns. And, well, you might be right. At least in part. Like the first (much loved) "Borderlands" game, "Borderlands 2" is a first-person-shooter/role-playing mashup that finds players on a distant planet, scooping up a stunning array of guns (there are "millions and millions" of them) that must then be used to take on a wildly colorful host of bad guys and even badder creatures. But give this game some real playtime and you'll discover that, like the first "Borderlands," what really makes "Borderlands 2" tic...
Pixel 5A Price In India : E1h2m3nv4xl25m . Pixel 5a launch in june? 3.9 out of 5 stars 12. The company recently wrapped up the annual i/o event. The mobile from google features 5.0. Pixel 5a price in india leaked pixel 5a launch date, design, full specs, availability. Google pixel 5a has been spotted passing the bureau of indian standards (bis) website ahead of its rumoured launch in india. Google pixel 5 prices in us, uk, india. The google pixel 5a sounds a lot like the pixel 4a 5g. The phone has 8 gb of ram and 128 gb internal storage. Pixel 5a launch in june? Google Pixel 6 Pro Specifications Design Renders Leaked As Google I O 2021 Ends 24htech Asia from cdn.24htech.asia Find out google pixel 5a full specifications and expected launch date. 3.9 out of 5 stars 12. Charger and accessories are not water resistant. Vishal aaditya kundu apr 12, 2021. R...
Праздник 19 Августа / Праздник 19 августа преображение господне | Открытки и ... . Все праздники и важные памятные даты россии и мира на 19 августа 2021 года. Русская православная церковь отмечает его 19 августа. Какой сегодня праздник, что можно, а что нельзя делать в этот день. Узнайте о праздниках, которые отмечают 19 августа. Яблочный спас — более известное название церковного праздника преображения господня. В народе — яблочный спас. Итак, 19 августа, в день праздника преображения господня, церковь вспоминает, как христос впервые явил перед тремя учениками свою божественную суть: Какие знаменательные события и даты отмечаются в мире в этот день — читайте в материале sputnik. Преображение господне отмечают православные 19 августа 2020. Ежегодно 19 августа отмечается яблочный спас. С праздником Преображения Господня! - Яблочный Спас 2021 ... from bestgif.su ...


Comments
Post a Comment